Virtual network with Open vSwitch


Virtual network with Open vSwitch
In this project, I want to show, how to designed and implemented a virtual network using Openvswitch and network namespaces under Linux. By leveraging virtual Ethernet tunnels and a central virtual switch, we create a flexible and scalable network environment. My main goal with this - besides understanding Linux namespaces better – is to have an isolated network environment. As a teacher I sometimes want to show my students how a single network protocol works, or what happens when I ping a domain. However even in a virtual machine there is often are many other network connection running in the background that it is difficult to filter to what I want I'm interested in. In that setup I create here the only noise in the virtual network is IPv6 Router Solicitation.
The plan
The following diagram illustrates a virtual network setup I want to achieve: The virtual Switch serves as the central point, connecting three distinct network namespaces represented by red, green, and blue. Each namespace is allocated an IP address (eth0-r, eth0-g, eth0-b) within the 10.0.0.0/24 subnet and is connected to the vSwitch via virtual Ethernet interfaces (veth-r, veth-g, veth-b).
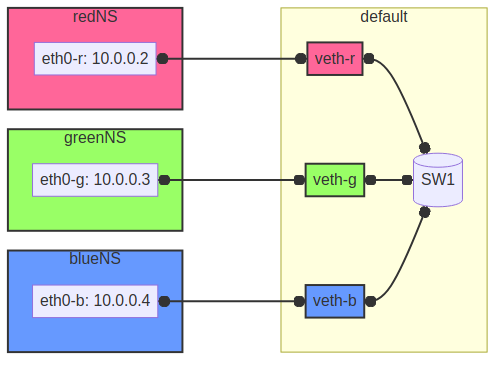
Figure 1: Network Diagram
Create functions for each name space
To begin with we define two variables to setup the intended namespaces and there associated color. The first variable is a simple index list, with the name red, green, and blue. The second variable is create with the bash-builtin declare with the option -x for export and -A for associated list. Here we associate escape codes for the color output in the terminal with the colorful namespace names. We put this definition in the file files/ovs_setup.sh.
export namespaces=(red green blue)
declare -xA colorlist=(red '\e[31m'
                      green '\e[32m'
                      orange '\e[33m'
                      blue '\e[34m'
                      magenta '\e[35m'
                      cyan '\e[36m')
We source this file in the second script files/ovs.sh to which we add all the following code. So we can easily recreate and even adopt this setup in the future. Within this script we first create a convenience function netns(). It takes a namespace name and the commands to be run in the namespace as input and excutes the command in the assigned namespace while color coding the output in the color associated with the name space. This way later on, we can easily see in which namespace a command was run.
script_dir="$(dirname ${BASH_SOURCE[0]})"
. ${script_dir}/ovs_setup.sh
function netns () {
    color=$1
    shift
    args=$@
    if [[ ${args[0]} = "bash" ]]
    then
        echo "To risky for my taste"
    else
        if [[ $(ip netns list | grep -o ${color}) == ${color} ]]
        then
            echo -ne ${colorlist[$color]}
            sudo ip netns exec ${color} ${args[@]}
            echo -ne '\e[0m'
        else
            echo "namespace ${color} does not exist"
        fi
    fi
    }
For even more convenience we create aliases for each namespace, so that a simple red, green or blue followed by the command will call the netns function for each of these namespaces.
for ns in ${namespaces[@]}
do
    alias ${ns}="netns ${ns}" && alias ${ns} && export ${ns}
done
Create namespaces
The next step is initializing the three network namespaces named red, green, and blue using the ip netns add command. I use a for loop to iterate over the namespace names. So it's easy to add new namespaces later on, if needed. Where needed I refer to them with the ${ns} variable.
for ns in ${namespaces[@]}
do
    if [[ ! $(ip netns list | grep -o ${ns}) == ${ns} ]]
    then
        sudo ip netns add ${ns}
        echo "${ns} namespace added."
    fi
done
ip netns list
sleep 1
Subsequently, the loopback interface within each namespace is brought up using the ip l dev lo up command to enable local communication within the namespace.
for ns in ${namespaces[@]}
do
  netns ${ns} ip link set lo up
    echo "Loopback in ${ns} is up."
done
Finally, we can check the current state of network interfaces within each namespace using the ip l command.
for ns in ${namespaces[@]}
do
  netns ${ns} ip link
done
Create tunnels
Now we create virtual Ethernet tunnels (veth) named veth-r, veth-g, and veth-b, each paired with an interface in its respective network namespace (eth0-r, eth0-g, eth0-b) for communication. These tunnels facilitate communication between the vSwitch and the network namespaces. Note that in the device names, I only use the first letter to distinguish the namespaces. For this I use bash's variable substitution mechanism with ${ns::1}, I get just the first letter of each string. Be aware, that this is a bash feature, when your using another shell.
for ns in ${namespaces[@]}
do
    sudo ip link add veth-${ns::1} type veth peer eth0-${ns::1}
    echo "Linked veth-${ns} to eth0-${ns}."
done
Place link in namespaces
After creating the tunnels, the next step is to assign the interfaces to their respective namespaces. This is achieved by associating each tunnel's endpoint (eth0-r, eth0-g, eth0-b) with its corresponding namespace (red, green, blue).
for ns in ${namespaces[@]}
do
    sudo ip link set eth0-${ns::1} netns ${ns}
done
Add IPv4-Addresses
Finally, IPv4 addresses are assigned to the interfaces within each namespace to enable network communication. The IP addresses 10.0.0.2, 10.0.0.3, and 10.0.0.4 with a /24 subnet mask are allocated to eth0-r, eth0-g, and eth0-b interfaces, respectively. Additionally, the interfaces are brought up to activate the network configuration.
ip=1
for ns in ${namespaces[@]}
do
    ip=$((ip+1))
  netns ${ns} ip address add 10.0.0.${ip}/24 dev eth0-${ns::1}
  netns ${ns} ip link set dev eth0-${ns:0:1} up
    echo "Add IP 10.0.0.${ip} to eth0-${ns::1}."
done
Open virtual switch
To set up the virtual switch, first, the Openvswitch package is installed using the appropriate package manager, followed by starting the ovs-vswitchd service to manage the switch.
Install
if [ -f /etc/os-release ]; then
    . /etc/os-release
else
    echo "Cannot determine the Linux distribution."
    exit 1
fi
case $ID_LIKE in
    debian|ubuntu)
        sudo apt install -y openvswitch-switch
        ;;
    fedora|rhel|centos)
        sudo yum install -y openvswitch
        ;;
    suse)
        sudo zypper install -y openvswitch
        ;;
    arch)
        sudo pacman -Syu openvswitch
        ;;
    *)
        echo "Unsupported distribution."
        exit 1
        ;;
esac
if  [[ $ID == arch ]]; then
    sudo pacman -Syu openvswitch
else
    echo "Unsupported distribution."
    exit 1
fi
sudo systemctl start ovs-vswitchd.service
echo "Started ovs-vswitchd"
Add Switch
After installation, I create a virtual switch named SW1 using the ovs-vsctl add-br command.
sudo ovs-vsctl add-br SW1
The switch configuration is displayed using ovs-vsctl show.
sudo ovs-vsctl show
Add ports
Next, we add ports to the virtual switch to connect it with the network namespaces. Each port is associated with a corresponding tunnel interface (veth-r, veth-g, veth-b).
for ns in {r,g,b}
do
    sudo ovs-vsctl add-port SW1 veth-${ns}
    echo "Added veth-${ns} to SW1."
done
Again we can confirm everything has work as intended with:
sudo ovs-vsctl show
These ports must now be activated.
for ns in {r,g,b}
do
    sudo ip link set veth-${ns} up
    echo "Link veth-{ns} is up."
done
I always like to double check. So I grep for the veth interface and use the -A option to always show the first 3 lines of each interface configuration.
sudo ip a | grep veth -A3
Cleanup
A reboot will always clean most of the mess behind us, but I want to be a good child and clean up for my self, so I created another script to do exactly this.
script_dir="$(dirname ${BASH_SOURCE[0]})"
#Source Setup
. ${script_dir}/ovs_setup.sh

# Create a list of target interfaces
for ns in ${namespaces[@]}
do
    target_interfaces=(${target_interfaces[@]} veth-${ns::1})
done

# Check for existing namespaces
if [[ -n $(ip netns list) ]]; then
  echo "Removing network namespaces..."

  # Loop through each namespace and remove only matching ones
  for ns in $(ip netns list | awk '{print $1}'); do
    if [[ "${namespaces[@]}" =~ "$ns" ]]; then
      sudo ip netns del $ns
      echo "Removed namespace: $ns"
    fi
  done
else
  echo "No network namespaces found."
fi

# Check for existing veth interfaces
if [[ $(ip link show | grep veth -c) -gt 0 ]]; then
  echo "Removing veth interfaces..."

  # Loop through each veth interface and remove only matching ones
  for veth in $(ip link show | grep veth | awk '{print $2}' |sed 's/@.*$//g'); do
    if [[ "${target_interfaces[@]}" =~ "$veth" ]]; then
      sudo ip link del $veth
      echo "Removed interface: $veth"
    fi
  done
else
  echo "No veth interfaces found."
fi

echo "Stopping and disabling Open vSwitch..."
sudo systemctl stop ovs-vswitchd.service

# check if named run directory for blue namespace exitsts
if [[ -d $(ls -d blue_named_run_?????) ]]; then
    rm -rf blue_named_run_?????
    echo "Removed run directory for named service in blue".
fi

for ns in ${namespaces[@]}
do
    if [[ $(alias ${ns}) ]] ; then
        unalias ${ns}
        "Unaliased ${ns}."
    fi
done


echo "Unseting netns function and variables"
unset -f netns
unset namespaces
unset colorlist

echo "Cleanup complete!"
Conclusion
It is surprisingly easy to create this basic setup.
We can now go and explore the different name spaces, by calling network related command with the red(), blue() and green() functions like:
sudo blue ip route
sudo red ping 10.0.0.3 -c 5
sudo green nstat -s | grep -i icmp
This is a great playground to explore basic network functionality.
Acknowledgment
I learned on network namespaces with this to fantastic videos: