Virtual network (Part II): DNS


Add DNS to Virtual network
In the first part we created a little switched network between three virtual devices, each of which we placed in it's own namespace (red, green and blue). We connect them with an (Open) Virtual Switch with three ports (veth-r, veth-g and veth-b). The whole toology looks like this:
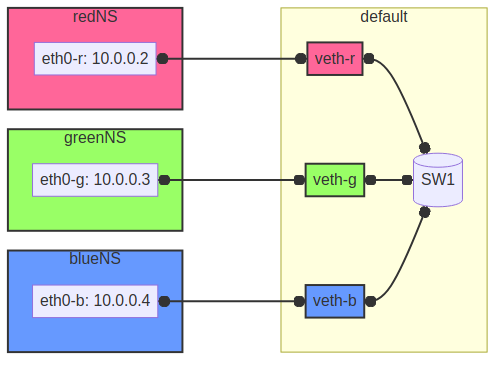
Figure 1: Network Diagram
Now we want to add DNS1 to the mix.
Installing Bind
For this we first need to install an DNS server. There are a few options like dnsmasq or djbdns but we stick with bind9 as the quasi standard for DNS servers.
if [ -f /etc/os-release ]; then
  . /etc/os-release
else
  echo "Cannot determine the Linux distribution."
  exit 1
fi

case ${ID_LIKE%% *} in
  debian|ubuntu)
    sudo apt install -y bind
    ;;
  fedora|rhel|centos)
    sudo yum install -y bind
    ;;
  suse|opensuse)
    sudo zypper install -y bind
    ;;
  arch)
    sudo pacman -Syu bind
    ;;
  *)
      echo "Unsupported distribution."
      exit 1
    ;;
esac
if  [[ $ID == arch ]]; then
    sudo pacman -Syu bind
else
          echo "Unsupported distribution."
          exit 1
fi
Creating configuration directories for namespaces
Next we need a configuration directory for each network namespace. This is where all applications aware of network namespaces look for configuration files, relative to there 'general' place in the /etc/ directory.
sudo mkdir -p /etc/netns/{red,green,blue}
Creating the configuration files for bind
We want to run the DNS in the blue namespace. So we first create the bind directory in /etc/netns/blue/.
sudo mkdir -p /etc/netns/blue/bind/zones
Now we need to create and edit the file /etc/netns/blue/bind/named.conf.local, first adding a forward zone.
zone "col.or" {
    type master;
    file "/etc/bind/zones/db.col.or";
};
Now we add the reverse zone for our virtual network (10.0.0.0/24):
zone "0.0.10.in-addr.arpa" {
    type master;
    file "/etc/bind/zones/db.0.0.10";
};
Finaly we need to deactivate DNSSEC, as we don't have permission for the associated key directory.
dnssec-enable no
Forward zone file
We need to created and edit the actual zone files. First /etc/netns/blue/bind/zone/db.col.or.
; BIND data file for local loopback interface

$TTL    604800
@       IN      SOA           col.or. admin.col.or. (
                            205         ; Serial
                         604800         ; Refresh
                          86400         ; Retry
                        2419200         ; Expire
                         604800 )       ; Negative Cache TTL

@      IN      NS          ns.col.or.

ns     IN      A       10.0.0.4

red    IN      A       10.0.0.2
green  IN      A       10.0.0.3
blue   IN      CNAME   ns.col.or.
Reverse Zone
We also need the /etc/netns/blue/bind/zone/db.0.0.10 file.
; BIND reverse data file for local loopback interface

$TTL    604800
@    IN    SOA    col.or. admin.col.or. (
                200        ; Serial
             604800        ; Refresh
              86400        ; Retry
            2419200        ; Expire
             604800 )    ; Negative Cache TTL


@    IN      NS      ns.col.or.
ns   IN      A       10.0.0.4

4    IN      PTR     ns.col.or.
2    IN      PTR     red.col.or.
3    IN      PTR     green.col.or.
(Re)generate virtual net
Now it's time to (re)generate the virtual network from the first part. For that we need to source ovssetup.sh and ovs.sh.
CWD=$(dirname $(find /home/ -type f -name db.col.or))
. ${script_dir}/ovs_setup.sh
. ${script_dir}/ovs.sh
We can now the zone files for syntax error, hoping to get no error messages:
blue named-checkzone col.or db.col.or
blue named-checkzone col.or db.0.0.10
Creating resolv.conf files
We finally need to tell the virtual hosts, where to find the name server, by creating resolv.conf in both /etc/netns/red/, /etc/netns/green/ and /etc/netns/blue/.
nameserver 10.0.0.4
Start the named Service
It is now time to start and test the DNS server in the blue name space. For this to work, to start it from a globaly writeable directory.
RUNDIR=$(mktemp -d blue_named_run_XXXXX)
chmod 777 ${RUNDIR}
cd ${RUNDIR}
blue named -c /etc/bind/named.conf.local
red nslookup green.col.or
Acknowledgment
Most of what I have done in this part builds on Balajinaidu's Blog on this topic.
Footnotes:
Domaine Name Service: associates a full qualified domain name like www.kernel.org with an IP address.